📚 Libraries
What are Libraries
- The core of GameSuite's DoD (Data oriented Development)
- A database, saved as scriptable objects.
- Libraries are data containers which contain lists of LibraryAssets, you could see a Library as a database table and LibraryAssets as rows in the table.
- Libraries can be accessed easily from anywhere in code.
- Whenever there are multiple items of the same type, or even different types with multiple values, it is advised to use Libraries.
Advantages of using Libraries
- A uniform way of accessing data
- Rename any file or LibraryAsset without breaking any references
- Change values at runtime to see the results instantly
- Visually edit all data in the game
- Create custom visualizations for any data by using the full power of Odin Inspector
- Easily allow any discipline in the team to deliver new assets and tweak existing parameters
- Decoupled data: Everything is weak referenced internally using Guids: each LibraryAsset is a tiny decoupled piece of data
- LibraryAssets from all sources are combined as one: all folders in the project, Resources and Addressables
- Libraries can be downloaded from Asset Bundles on CDNs, which allows updating any piece of data quickly without the need to distribute new builds
- See exactly what data changed in your version control system, allowing branches and releases
- Allow assets in development by enabling or disabling them with a checkbox
- AB Test anything: Enable, Disable or Swap any LibraryAsset
How to create Libraries
Lets take an example where the game needs lots of levels.
Each level has multiple configurable values such as:
- Name
- Icon
- Level scene
- Difficulty level
- Rewards
First we do a tiny bit of code generation to prepare the data needed.
Go to Tools > GameSuite > Preferences panel.
Open Libraries and type the name of the Library you want to create.
Type the name of the library, in this case enter Level into the Library Name field.
Press the Create Library button and open a folder where to save the files.
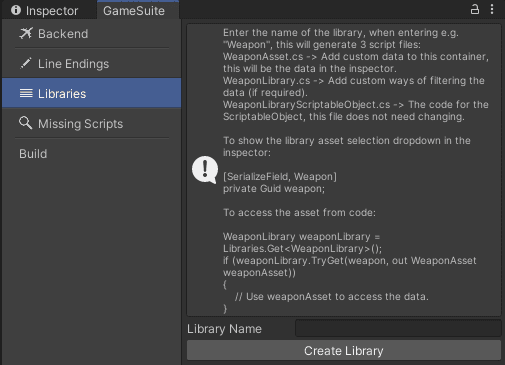
This will generate 3 files at the location:

LevelAsset
This is the file where you will add your data into, and in 99% of cases the only file you have to edit.
using GameSuite;

namespace Game
{
	public class LevelAsset : BaseLibraryAsset
	{
        // Add your data here.
	}
}
LevelLibrary
Can be left alone, unless you need very specific way of accessing the data. There should be no actual logic inside the Library file itself, create a Service if you need game logic. Only use the Library file for fetching, sorting and organizing the data. For example a method that returns all levels of a certain difficulty.
LevelLibraryScriptableObject
This is the ScriptableObject and this file should not be edited.
The files will be in the Game namespace, read the Namespace chapter for more info.
How to access Libraries
To show a dropdown in the inspector to select your new data:
[Level]
public Guid Level;
To get an asset from your new Library:
if (Libraries.Get<LevelLibrary>().TryGet(Level, out LevelAsset levelAsset))
{
    // Do things with your library asset here.
}Dropdowns not appearing
In order for the dropdowns to appear in the inspector and have advanced inspector serialization and visualization features, you need to inherit your component from SerializedMonoBehaviour or in case of a ScriptableObject; SerializedScriptableObject.
Creating LibraryAssets Files
As we have the code part, now let's create the ScriptableObject files which will fill the Library database.
GameSuite supports Libraries from these locations:
- Resource/Libraries folder at any position in the project
- Content/Libraries folder
- Any Library from any folder in the project which is Addressable.
- Add the "library" label in the Addressables Group window. Please refer to the Addressables chapter to learn more.
- GameSuite will combine all found libraries together, either from Resources or Addressables, there is no difference in accessing them through code, as thats all taken care of.
Inside the target folder, create a folder with the same name as the library, depending on if you use addressables (where the Content folder is marked as Addressable) or just use Resources folders:
- Content/Libraries/LevelLibrary OR
- Resources/Libraries/LevelLibrary

Right click on the spot where you want to create the LibraryAssets:
Create > Game > Libraries > YourLibraryName

This creates a new file at the location, for example:
- Content/Libraries/LevelLibrary/LevelLibrary OR
- Resources/Libraries/LevelLibrary/LevelLibrary
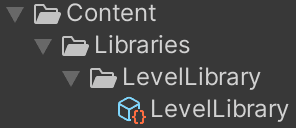
Select the file to view it in the inspector.
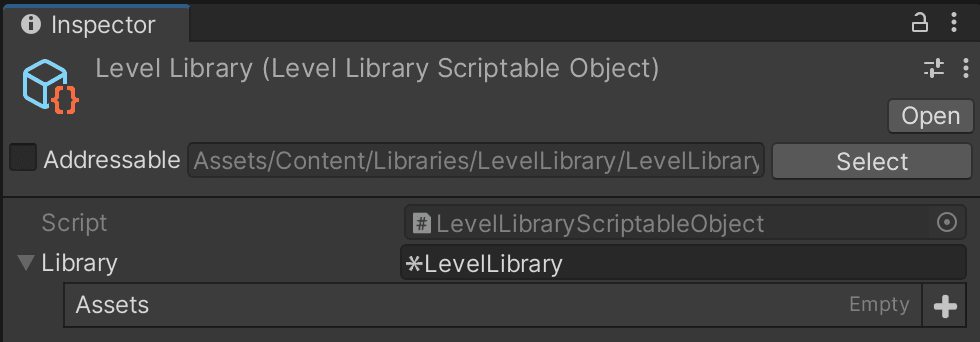
Now lets create a new level, by clicking the + button. Select the LevelAsset item from the dropdown. Later on, you will be able to use polymorphism to create new versions of levels with different data variations.

A new item has appeared in the Assets list with the default New Asset name.

If you press cmd/ctrl + S to save the project, the asset will take the name of the file.

Now you can rename this ScriptableObject file to whatever is preferred.
By renaming the file in the Project view, the level name will take the same name.

Creating assets faster
Once you have already created a LevelAsset before, its faster in the future to just duplicate an existing LevelAsset file using cmd/ctrl + D. Rename the new file name and change the content of the new file to your needs.
Default Values
Every LibraryAsset has the same bar in the inspector at the top and has 2 values:

Asset Name
This is the name displayed in the dropdown menus when referring to it from the inspector using [YourLibraryName]. Add a forward slash / to support sub folders in the dropdown. Spaces are also available to use for readability.
Organized naming
It is highly advised to use sub folders when there are lots of items. Good categorization will make finding them a lot easier. For example: "Enemies/Bosses/Giant Orc"
Safe to rename without breaking links
Don't worry about the name of the file and the name of the asset, rename and move them around as much as you want without breaking any references, as they are internally referenced through their (hidden) Guid.
Auto naming
By default, the name is of a created asset is New Asset. If you press cmd/ctrl + S, which saves the project, the name will be the same as the name of the file. If in any case you rename the file name, and the name of the asset was the same as the filename, the asset will automatically take on the name of the asset.
So even though the name of the asset and file are separated, when you have only a single asset inside a file, the name will automatically sync.
Enabled
Turn on or off any LibraryAsset, for example when it is in development and should not be included in the build yet.
This value is not accessible from code. When turning off a LibraryAsset, it will not be accessible through the Library. This feature is also controlled by the AB testing tool.
Do not use the Name variable for logic
Never use the AssetName field directly for anything logic related.
If you need a specific identifier for any reason (aside from the Guid), add a new field to the LibraryAsset to use.
It should only be used for showing the asset in the inspector using [LibraryName] or for debugging and logging items.
Guid
Every file has a unique id, which is hidden in the inspector by default as this will never change and developers should not worry about these. Just in case you do, check the View Guids section.
Adding our data
Taking a look at our initial goal, we need to add some data to our LevelAsset to be able to configure the data needed.
using GameSuite;

namespace Game
{
	public class LevelAsset : BaseLibraryAsset
	{
        [TermsPopup]
        public string Name;
        [Resource]
        public Guid Icon;
        [Scene]
        public string Level;
        [Range(0, 10)]
        public int Difficulty;
        [Reward]
        public List<Guid> Rewards = new List<Guid>();
    }
}
This is what it looks like in the inspector:
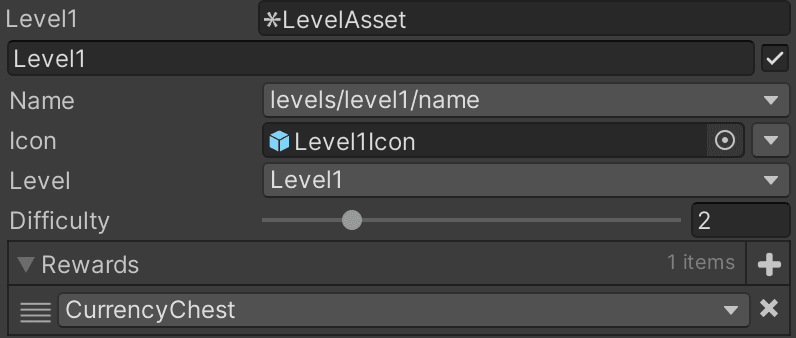
Now you can create many level and configure:
- A Localized name, selectable from a dropdown of available terms
- A GameObject that contains the UI icon which gets spawned in the level select screen
- Scene select dropdown, to load a particular scene for this level
- The difficulty range between 0-10
- A list of reward chests when winning the level
Folder structure
There are multiple ways supported to organize your LibraryAssets, all these methods are supported.
Library asset files can be either loaded at startup time or on the fly, these methods have pros and cons.
Preloaded libraries
In case of loading from Addressables, the root content folder should be marked as addressable, so that all child folders and files automatically become part of the addressables pipeline and therefore can be loaded from asset bundles:
- Content/Libraries/InventoryLibrary
- Content/Libraries/MusicLibrary
- Etc.
With preloaded libraries, the organization within these sub folders can be in different ways:
- Create 1 Library file which has a list of all items inside (Not advised)
Can be used when there are only a few library assets and will not get much bigger.

- Create multiple Library Assets and add e.g. 10 items per file. Can be used when dealing with thousands of files, such as levels:
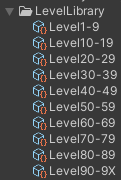
- Create 1 LibraryAsset per file (Advised)

- Create sub folders to organize the LibraryAssets (Advised)
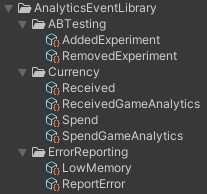
Best use case
The best and most common use case scenario is using option 3 and 4, unless you have 1000s of assets.
This has a single file per LibraryAsset, which makes it easy to check for changes in your version control system.
Organize with folders
Sub folders allow for easy organization and tracking lots of assets.
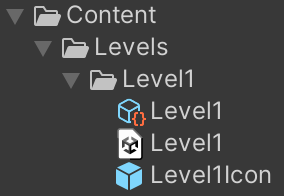
Group assets
Loading files from outside of a Content/Libraries/LibraryName is also supported. As long as the files are still in addressables, it is possible to put the library files anywhere in the hierarchy of the project.
On demand libraries
Loading the assets through Libraries.TryGet will block the main thread until its downloaded, unpacked and loaded into memory. This is not an issue in most cases if the file is small and already downloaded, as it only blocks for a short amount of time.
When you are sure the library files will take more time to download and load, it is possible to use the asynchronous loading method to load a single LibraryAsset. This method is by default build into all libraries.
using Sirenix.OdinInspector;
using GameSuite;

namespace Game
{
	public class LevelLoader : SerializedMonoBehaviour
	{
        [Level]
        public Guid Level;

        protected void Start()
        {
            Libraries.Get<LevelLibrary>().TryGetAsync(Level, LevelLoaded);
        }

        private void LevelLoaded(LevelAsset levelAsset)
        {
            // Do something with the levelAsset.
        }
	}
}
You can also cache an entire library async. This can be useful to add in a loading screen to make sure all assets are readily available in memory before continuing with the game.
Libraries.Get<LevelLibrary>().CacheAllAssetsAsync(OnLibraryLoaded);

private void OnLibraryLoaded()
{
    LevelLibrary levelLibrary = Libraries.Get<LevelLibrary>();

    for (int i = 0; i < levelLibrary.Assets.Count; i++)
    {
        LevelAsset levelAsset = levelLibrary.Assets[i];
        // Do something with the levelAsset here.
    }
}
Caching an entire library can also be achieved through the flow, using the Cache Library Assets flow action.
Polymorphism
The real power of Libraries, and GameSuite in general, is being able to use polymorphism in Unity.
LibraryAssets can be extended to support many sub-types of data by using inheritance.
Take the InventoryLibrary for example. The InventoryAsset is abstract and can be inherited by any required inventory item:
abstract class InventoryAsset

CharacterInventoryAsset : InventoryAsset
WeaponInventoryAsset: InventoryAsset
ArmorInventoryAsset: InventoryAsset
ConsumableInventoryAsset: InventoryAsset
QuestInventoryAsset: InventoryAsset
In order to get all the weapons in the Library:
InventoryLibrary inventoryLibrary = Libraries.Get<InventoryLibrary>();

// Gets all weapons.
List<WeaponInventoryAsset> weapons = inventoryLibrary.GetAllByType<WeaponInventoryAsset>();

// Or find a specific WeaponInventoryAsset with Guid weapon.
[Weapon]
public Guid Weapon;

if (inventoryLibrary.TryGetByType(Weapon, out WeaponInventoryAsset weapon))
{
    // Do something with the weapon data.
}
Of course the Asset does not need to be abstract to make this work. Many layers deep of inheritance are supported as well:
ArmorInventoryAsset: InventoryAsset
HelmetInventoryAsset : ArmorInventoryAsset
BootsInventoryAsset : ArmorInventoryAsset

WeaponInventoryAsset: InventoryAsset
AxeInventoryAsset: WeaponInventoryAsset
SwordInventoryAsset: WeaponInventoryAsset
LongSwordInventoryAsset: SwordInventoryAsset
DaggerSwordInventoryAsset: SwordInventoryAsset

ConsumableInventoryAsset: InventoryAsset
PotionInventoryAsset : ConsumableInventoryAsset
FoodInventoryAsset : ConsumableInventoryAsset
Expand everything!
You can inherit from any library asset where needed such as: MilestoneAsset, SfxAsset, RewardAsset etc. to contain the data you need and make it do exactly what you want.
Dropdown filters
When having many assets in a library with sub folders, you can also limit what is visible in the inspector. To make sure designers pick the correct items from the dropdown, add the sub folder you wish to display in the inspector dropdown.
To add sub folders in the selection dropdown, just add names with a forward slash / to add folders to the dropdown to easily find your data objects fast.
[Inventory("Weapons/Swords")]
public Guid Sword;File and asset name disconnected
When changing the file name or location, please remember the LibraryAsset name is disconnected from the location or name of the file itself. So you might want to change the AssetName field as well, depending on the scenario.
Aside from assigning a folder as a filter, it is also possible to set the type of the asset. Lets take an example with a bunch of inherited weapon assets from the Inventory:
public abstract class WeaponInventoryAsset : InventoryAsset { }
public class SwordInventoryAsset : WeaponInventoryAsset { }
public class DaggerInventoryAsset : WeaponInventoryAsset { }
public abstract class RangedInventoryAsset : WeaponInventoryAsset { }
public class BowInventoryAsset : RangedInventoryAsset { }
public class GunInventoryAsset : RangedInventoryAsset { }
Now in the inspector you can filter on any of the types:
[Inventory]
public Guid AnyItem;
[Inventory(typeof(WeaponInventoryAsset))]
public Guid AnyWeapon;
[Inventory(typeof(SwordInventoryAsset))]
public Guid Sword;
[Inventory(typeof(DaggerInventoryAsset))]
public Guid Dagger;
[Inventory(typeof(RangedInventoryAsset))]
public Guid AnyRangedWeapon;
[Inventory(typeof(BowInventoryAsset))]
public Guid Bow;
[Inventory(typeof(GunInventoryAsset))]
public Guid Gun;
Additionally a folder can be assigned as well (this is the asset name folder, not the file folder):
[Inventory("Legendary")]
public Guid LegendaryItem;
[Inventory(typeof(BowInventoryAsset), "Bows/Crossbows")]
public Guid Crossbow;
View Guids
In extremely rare cases, you might be interested in viewing the Guids behind the library assets to verify if assets are matching the expected result.
To toggle Guid visibility in the inspector:
Tools > GameSuite > Helpers > Show Guids
This will make the Guids appear on all LibraryAssets:

Use manual changes with caution
When changing the Guid manually, all references to this asset will be lost.